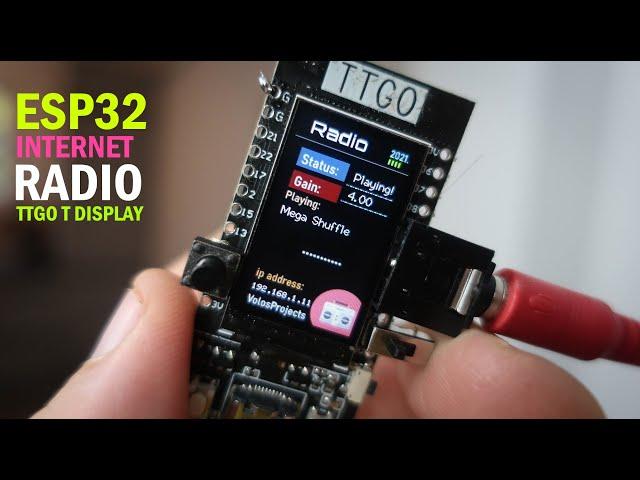
ESP32 Internet Radio TTGO T-Display board
Комментарии:

Great project with a great Grafik. I choose an additional PAM8403 to connect direct a loudspeaker with 3w. I use Platform-IO for that project. And I need a partition.csv in the directory with platform.ini:
# Name,Typ,SubTyp,Offset,Size,Flags
nvs,data,nvs,0x9000,0x5000,
factory,app,factory,,2M,
And then I can Upload the code.

Looks great. What Audio socket do you use?
Ответить
GREAT! But how can i choose wifi?
Ответить
Cool Project! Could I use anyone of ttgo on that page you linked to? And the jack connector, only two pin version?
Ответить
I have been playing with wifi radio for several years now, this seems to be a neat addition to my collection of such devices, thanks a million1
Ответить
The screen is flasing after uploading. 😢
Ответить
Nice just got it to work after uninstalling arduino ide and delting all the directories and starting fresh
Ответить
HI! Please HELP me ! Error : "Compilation error: 'TFT_BL' was not declared in this scope" Thanx !!!
Ответить
I really like your Internet Radio project, But I only have one question. Without a schematic to use, I took a screen shot of your project board to better understand where the extra button and slide switch was wired. After reviewing your sketch file I see that BTND=17 but in the video I don't see where this GPIO pin is being used. What am I missing. Any help you can give would be greatly appreciated. Thanks again for your videos they are very helpful for a beginner like myself.
Ответить
. Great project. You have 2 radio projects. 1 FM and 1 internet. How about combining them so we have FM reception and also internet and if we add Bluetooth probably we can stream playlists. Any feedback or advice on hw and libraries to use? You neighbor from Greece where internet sucks sometimes
Ответить
I love this project but i m wondering whether you can combine the Internet Radio together with the FM radio in your previous project you have done , Any tips?
Ответить
Do you think you can combine FM and internet Radio? in one, I saw you have another project with fm Radio.
Ответить
you write "connected to pins 26 and GND" which is the audio output pin26 (Dac2).
is the pin25(Dac1) also audio output? stereo output?
And which pin is the button connected to?
Pin 12 or 13

Hi! nice project! Tryed it today - had to remove frame.h otherwise error to big file 101%. I couldnt find any scematics which pins your using. did I miss something? Nice Greetings😎
Ответить
add DAC =)
Ответить
Could we get the schamatic.?
Ответить
What it means: Sketch too big. Error compiling for TTGO LoRa32-OLED 🤔
Ответить
Did not work :
"Compilation error: text section exceeds available space in board"

Hi,what could be possible reasons that arduino ide says not enough space during upload?
TTGO is fresh,brand new,cooking to the recipe.
Thanks

I have tried to add other stations but can't get any to work
Has anybody any tips or hints how I can do this

I hate to be even slightly critical since I think ALL your Volos Projects are Very cool.... but I know I'd really struggle building some of them without a schematic and simple parts list with Part Numbers..
When you place components around the edge of the dev board, and don't give us any info on what pins need to be wired to them, or the value of the Potentiometer that may be needed, or how to wire the Audio Jack, or rotary encoder etc.. and also fail to give us a photo or view of the BACK side of the project anywhere in the video .. I get very discouraged knowing it may be very hard to figure that stuff out.. You always make downloading and using your excellent code VERY easy .. But the hardware and hookup needed can be very hard to replicate.. BUT, If you could please just add a simple photo of a hand-drawn schematic to the project's GIT Hub repository that would solve the problem several others have commented on below. I really do want to make this Internet Radio but have no idea how to wire its switches, jack and pot..

Hi! I loved your TTGO radio sketch, I wonder is it possible to add a DAC Module 1334 UDA1334A if so do you have ideas how to change the sketch. Thanks
Ответить
Cool!
Ответить
I built it! Utilised an old powered PC speaker and built it all into a repo radio case. If you'd like pictures let me know.
Ответить
Very nice project and looks good, so is it 8 bit and mono output?
Ответить
Great project!. what about hardware wiring? - I don't know how to wire the audio connector
Ответить
Anyone get this error? InternetRadio.ino: In function 'void setup()':
InternetRadio:96:17: error: 'TFT_BL' was not declared in this scope
ledcAttachPin(TFT_BL, pwmLedChannelTFT);

Great video! I would like to output the audio to a pcm5102a dac via I2S. Is this easily implemented? Any suggestions would be great! Thanks.
Ответить
Looks great, I'm looking at building this. I see the pin 26 DAC is used for the Audio output. I see pin 25 is also a DAC, so I wonder how difficult it would be to implement stereo - any thoughts anyone?
Ответить
where can I find the circuit diagram?
Ответить
Very Cool!
Ответить
I tried to compile the program from the links that you provided here but I get error some issues with the library file "ESP8266Audio-master\src\AudioOutputI2S.cpp
:234:7: error: 'i2s_config_t' has no non-static data member named 'mclk_multiple' }; "
Perhaps you know what is this and how to fix it.
Question, this is the exactly files that you used in your project or you made some modifications, it you did, it's possible please to get from you your modified files? because the way it is it doesn't work. Thanks

very good. Pro
Ответить
maybe you should try using BT to play sound?
Ответить
Watching your esp32 video's, i have also catched the esp32 fever. Thank you🙃
Ответить
just amazing~ I gonna order in Ali Ex=)
Ответить
So many questions left unanswered! What pins are you using for output (I see in comments). Are you driving a speaker directly or an amplifier? What amplifier or what kind. Where did you get that breadboard mini-phono connector?
Ответить
it would be great to connect a weather station and internet radio in one project
Ответить
SomaFM FTW
Ответить
🆒 Thank you so much for uploading this video.
👍👍👍👍👍
Sharing with community 🇵🇰

Hello , where is enable to see the schematic please thanks thanks
Ответить
please, Help me
In file included from C:\Users\Hermes\Documents\radio ttgo\TTGOInternetStation-main\InternetRadio\InternetRadio.ino:13:0:
frame.h:1:1: error: stray '\357' in program
int frames=100;
^
frame.h:1:1: error: stray '\273' in program
frame.h:1:1: error: stray '\277' in program
Se encontraron varias bibliotecas para "WiFi.h"
Usado: C:\Users\Hermes\AppData\Local\Arduino15\packages\esp32\hardware\esp32\1.0.4\libraries\WiFi
No usado: C:\Program Files (x86)\Arduino\libraries\WiFi
Se encontraron varias bibliotecas para "SD.h"
Usado: C:\Users\Hermes\AppData\Local\Arduino15\packages\esp32\hardware\esp32\1.0.4\libraries\SD
No usado: C:\Program Files (x86)\Arduino\libraries\SD
exit status 1
stray '\357' in program

Very good project, as usual. I did your project Weather station, it is amazing. Thanks.
Unfortunately, for internet Radio there is an error of compilation below. Do you have any idea to solve that?
again, thanks for sharing your knowledge.
Arduino: 1.8.12 (Mac OS X), Placa:"TTGO LoRa32-OLED V1, 80MHz, 921600, None"
Erro compiling to the board TTGO LoRa32-OLED V1

Which version of board do you recommend? There are 3 types available at Banggood link you provided - different memory, different transfer speed, what is better?
Ответить
Hi, I have realized, jut a very few stations/links can be player , it seems, there is a kind of limitation -- what is the correct format, bitrate etc. to use to insert into the sketch?
thanks in advance!!!

When I try it, it says Playing but never plays, and resets sometimes when I press the buttons.
Ответить
It seems my previous comment was deleted.... maybe because the attached link.
So thanks for sharing, this works fine, and there is no problem to upload the sketch. It is a very useful project for me, there are some stations here, available just via net.
Let me suggest / kindly ask for a development of the project. It would be very useful to include a web server, enabling an easy way to enter wifi credentials. In this way the project would be really universal, and mobile, enabling to take the device with you, connect, and use anywhere.
I guess, most of us would be grateful for this functionality!
Thank you to take my comment into consideration, and many thanks for developing, and sharing this project!!!


