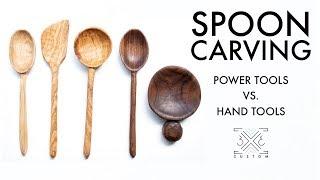
Experimenting with Spoon Carving // Hand Tools vs. Power Tools // Woodworking // Wood Carving
Комментарии:

Why no wooden spoon holder to hold your wooden spoons
Ответить
wow u really have a skill there. beautiful. im a stroke survivpr
limited use in left hand. its hard 4 me 2 do things now. would u b
interested in masking me a hoimemade wooden spoon to send to me in nova
scotia? it would b treasured 4ever. if not, thats ok i really adsmire
ur work. thx 4 reading my note pardon typos im only able to use 2
fingers. have a fabulous day... fr karen in nova scotia.

Such a great video!!!!!really really good job great work
Ответить
I love Paul Sellers! Such a master at his craft and a gentle human being!
Ответить
Always wondered how to do this
I will be looking for other videos to expand the concept. Love your work Tamar!

👍👍👍
Ответить
We sanding with olive oil is so gratifying! I'm experimenting, too. Thanks for sharing your processes.
Ответить
you are so cool. lol
Ответить
Beautiful. Your videos are inspiring me to get wood working. Just need to clear my garage out now 😂
Ответить
hello..I made a wood spoon rest after watching your video. Thank you for being an inspiration to me.
Ответить
Oh my God!!! You are the best!!! I am new at wood carving and am undecided if I should work with chisel or power tools. Your video definitely gave me an answer to that. Thank you so much for showing me useful tips on carving with both power tools and chisels.
Ответить
I love the little ball on the spoon rest, it looks a bit like looking down on a lotus flower, nice job, the facet marks for me are what makes a perfect spoon.
Ответить
Did using the scraper prevent you from needing to sand the inside the bowl?
Ответить
What is the name of the clamp attached to the table that holds the wood while you work on it please? Is it sold with the table or can I buy it on its own?
Ответить
I love it
Ответить
It's funny because I was watching a Paul Sellers video and it lead me here. :)
Ответить
Awesome spoons dude.
Ответить
Great job on this video. I will be carving and scraping. Thank you.
Ответить
That was fun to watch. Maybe a way to sit in the warm cabin and pass long winter days. As far as power tools I give the thumbs up to the router and band saw. The ultimate was the hand carving tools, especially the gouge. I don't have any of those and I need to include a spokeshave into my tool collection.
Ответить
Très bon travail
Ответить
💥👏👏👏👏👏👏💥
Ответить
Nice spoons! I enjoyed your video. 👍
I use scrapers every day...Scrapers are like chisels...if you grind fast they blue and lose their temper. I saw in the video the edges of yours were burned blue. The burr will work better and last longer if you grind slow and cool with water and finish with a file or a water wheel like a Tormek.
I liked your olive spoon best.

Thanks for sharing those tips and the make!
Ответить
Givens lots I have made as Christmas gifts
Ответить
Hi, your's job is great, i'm from Ukraine & i Just beginner for graving, i wery like it, thank you
Ответить
You’re supposed to use green wood. You have to check out “silent spoon carving” videos.
Ответить
Being a machinist and tool maker before going into carving wood spoons, here is what I used: Bandsaw for 3 d rough contour. 80 grit disc sander for rough shaping using the wood lathe to hold the disc, which was rubber and then I have a choice of speeds to use. Wood shaping rasps for getting closer to finish shape. Sand paper for finish, but for sure I was thinking of a contoured set of scrapers as you used. For the bowl, I used the drill press to put a hole in the deepest part of the bowl, as large a drill as practical, staying about 1/32" yet to finish at the very bottom point. The drill leaves a compressed spot at the center web of the drill, so leave material for clean up. Start with the gouge by making a cone shaped hole, then use the gouge to finish the bowl. Then, skip the sandpaper in the bowl and use a scraper as you did. I will soon begin using a burnishing technique to flatten the wood fibers down, something I saw an English spoon maker use. After that, soak with tung oil or walnut oil mixed with lemon oil, wipe with a rag after a good soak, put in a toaster oven to dry fast at 200 degrees, buff with fine steel wool, and use a bees wax mix to finish with a final buff.
Ответить
Thankyou,I enjoyed you video,especially the making of the bowl scraper.
Ответить
Great video. I hope someone talked you out of using carving disks. Some of them are not safe in the slightest. Not attempting to tell you what to do or not do. Merely giving a friendly heads up to the disks.
Ответить
I happened on this, it showed up on my main page. I am glad I found it. I am just starting. I want to do it as a way to make my woodworking “to-go”. I put together a carving kit. Since this video is 2 years ago, you may not see this comment. But I wanted to suggest some spoons to carve. It allows you to do some more carving. You would still rough cut with the bandsaw, and then carve from then on. For the spoons you carved, I like you suggestions os using the router to create the bowl. The spoons I want to suggest, the bowl is usually hand carve . They are called Welsh Love Spoons.
Ответить
I have been carving spoons in my head at work all eeek. I was thinking a cove bit on my palm router would work. I watched all the vids. I came to you and you did it with the router first and you were the best of all that I watched. As usual thanks..
Ответить
Spoon carving is usually done with wet wood, not a super fair comparison. So much more labour to hand carve already dried out wood 😅
Ответить
Hi Tamar, I love your content and learn a lot from you.
I bought a couple of Kutzall carving disks to make a couple of sculpted pieces of furniture and I love love love them. It has really expanded the type of work that I do. I would highly recommend you pick one up if you can.

God job 😀😀😀
Extra inpiration 😉👌👍

I Did Something I've Never Done
Before & That's Carve Out A Guitar Pick & A Napkin Holder. All I Used Is An Osscolating Multi Tool.

I Used A Carving Bit On My
Ryobi Rotary Tool. At first It Didnt
Look So Good Till I Worked At It
For A While. It Looked A Little
Better Then It Did.
It's Really Gonna Be A
Spoon Rest For Resting Dirty
Spoons To Keep From Messing Up
You'r Counter. I Think After
I Work At It A While It'll Look More
Like A Spoon Rest.

Great video and very informative! I've been a carpenter for 20 years or so but just late last year I took on my first woodworking project. I built a really nice box for my daughter for this Past Christmas. Today I continued working on my first wooden mallet. NOW, my wife has been asking me "When are you going to make me a wooden spoon??" LOL! Yes, that will be my next project for sure. It's tough working on projects out in my garage with limited tools and 25-30 degree temperatures. More spoon making research and by spring I will be hopefully making my wife not one but several spoons!! Thanks Tamar!!
Ответить
Fantastic!
Ответить
What is traditional bed making?
Ответить
I Traced Around A Ceramic Spoonrest &
It Turned Out Great the Onlything
I Didn't Do Was Carve The River In
The Handle But I'm Pretty
Satisfied With ItAwith
Il

Was that dry or green wood? You did a great job.
Ответить
Try the kutzall burrs in your dremel,great for spoon bowls
Ответить
🇧🇷 amei esse vídeo , são lindas essas colheres otimas pra decoração parabéns 👏👏👏👍
Ответить
I just bought a hook knife, and have scanned 50+ spoon videos. This video is by far the best. Not only great, thorough content, but very well presented in a well produced video. Thank you for posting.
Ответить
nice job. Your kids are lucky to have you. Make more videos.
Ответить
Great craftmanship
Ответить
Fantastic!
Ответить
Você é linda como essas colheres também 💋💋👏👏👏👏🇧🇷
Ответить


